Using the Workflow Editor
Learn to organize nodes, connect branches and loops, configure simulations, and manage Path of Exile 2 crafting workflows.
Find your way around the editor
The workflow editor is divided into three working areas.
Drag item, currency, logic, output, and annotation nodes onto the canvas.
Arrange nodes and connect them to define the paths an item can follow.
Select one node to edit its item, currency, condition, price, label, or note settings.
- Drag an empty part of the canvas to pan, or hold Space while dragging.
- Use the mouse wheel, the canvas controls, or the minimap to move around a large workflow.
- The fit-view control frames all nodes on the canvas.
Select and move nodes
- Click
- Select one nodeThe selected node appears in the Inspector. Click empty canvas space to clear the selection.
- Ctrl / ⌘ + Click
- Add or remove a node from the selectionUse Control on Windows or Linux and Command on macOS.
- Shift + Drag
- Draw a selection boxFully surround the nodes you want to select together.
- Drag
- Move the selectionDragging any selected node moves the selected nodes together and keeps them aligned to the grid.
Copy, cut, paste, and delete
These shortcuts work while focus is on the editor rather than inside an Inspector form field.
- Ctrl / ⌘ + C
- CopyCopies every selected node to the editor's local clipboard.
- Ctrl / ⌘ + X
- CutCopies the selected nodes, then removes them from the workflow.
- Ctrl / ⌘ + V
- PasteCreates a selected duplicate, offset slightly from the original selection.
- Delete or Backspace
- DeleteRemoves selected nodes or edges. Removing a node also removes every edge attached to it.
Connect nodes with edges
Drag from an output handle on the right side of a node to the input handle on the left side of another node. The arrow at the end of the edge shows the direction the item will travel.
- An input can accept many edges. Several earlier paths can merge into the same node.
- Each output can have only one edge. A branching Logic node has several outputs, but each labeled output can still lead to only one destination.
- Connecting an occupied output replaces its old edge. You do not need to delete the old connection before choosing a new destination.
- Note Groups do not accept connections. They organize the canvas but are not executed.
Use merged inputs to build loops
Because an input can accept more than one edge, a Logic node can receive both the original entry path and the result of a retrying crafting step.
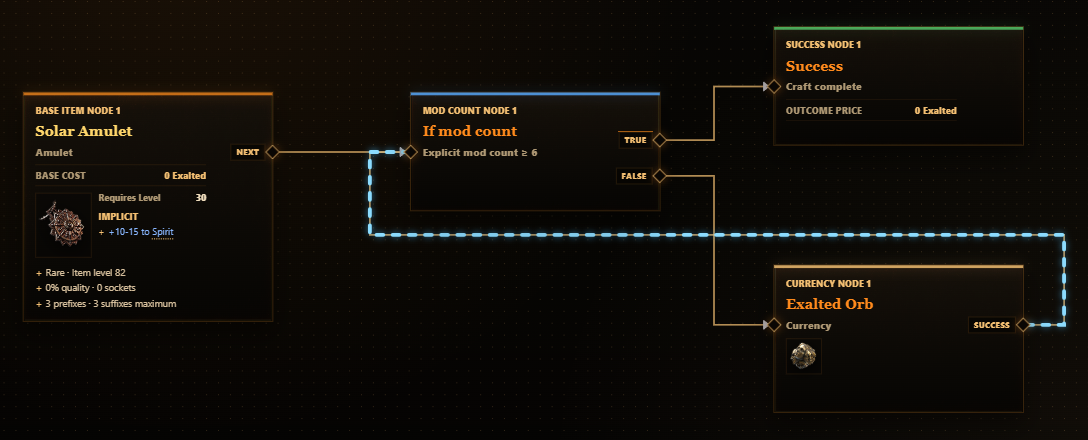
In this example, Mod Count checks whether the item has at least six explicit modifiers. If it does not, the False branch applies an Exalted Orb and sends the item back to Mod Count. The simulator repeats this loop until the item has at least six explicit modifiers, then follows the True branch to Success. Mod Count accepts incoming edges from both the Base Item and the retry path, while each output still has only one outgoing edge.
Organize with Note Groups
A Note Group is a resizable annotation and container. Drop a node fully inside a group to attach it; the group highlights while a node is positioned to join it. Moving the group then moves everything it contains, and moving a child outside detaches it.
- Copy a Note Group to copy all of its descendants and the edges between them.
- Delete only the Note Group to remove the annotation while preserving its contents.
- Select the contents too when you want deletion to remove the group and those nodes.
Configure workflow settings
Open the gear menu beside Run to configure the next simulation.
Sets the number of attempts. If the canvas contains multiple separate valid workflows, each is run once during every attempt.
Keeps producing and retaining completed attempts until you select Stop.
Limits how many nodes one item can visit, protecting the simulation from runaway loops.
After a simulation, the Traversal heat control colors edges by relative traffic within each workflow and displays the exact traversal count. Turn it off when you want to see the authored connections without the result overlay.